Every Thanksgiving, for as long as I can remember, I get stuck on cheese grater duty. My mom stations me by the kitchen sink and hands over huge blocks of cheddar cheese and charges me with the task of turning those blocks into mounds of golden goodness that would make Scrooge McDuck proud. Quite frankly, I’m pretty sure that Wisconsin has a shortage every Thanksgiving because of all the cheese I’m grating.
 Thing is…no one really loves grating cheese. It’s monotonous and repetitive and it sorta makes your arms tired after a while. But then..oh…but then, when that gooey mac & cheese emerges from the oven, I can take complete credit for all of its deliciousness. Because we all know that perfect mac & cheese all boils down to impeccable grating technique, right?
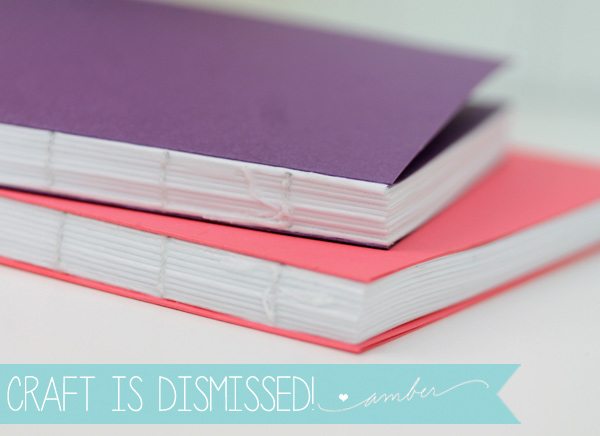
So why all this talk about mac & cheese: Well, here’s the deal: text blocks are the “cheese grating” of bookbinding. Creating a text block is not a terribly riveting task, but it’s the most important part. And when your handbound notebook is complete, you will revel in the perfection of that text block.
Today’s Bookbinding University lesson is all about the text block. I encourage you to spend some time with this tutorial and give yourself plenty of practice. Your first one may not be perfect, but that’s okay! After a few tries, you’ll be doing this by memory and won’t even need the tutorial anymore. Stick with it!
 This tutorial is a longer one, clocking in at 19 minutes and 8 seconds, but I’ve broken it into sections to make it much easier to follow. Below you’ll find minute markers to help find exactly what you need to know!
[ylwm_vimeo height=”400″ width=”600″ ]72243341[/ylwm_vimeo]
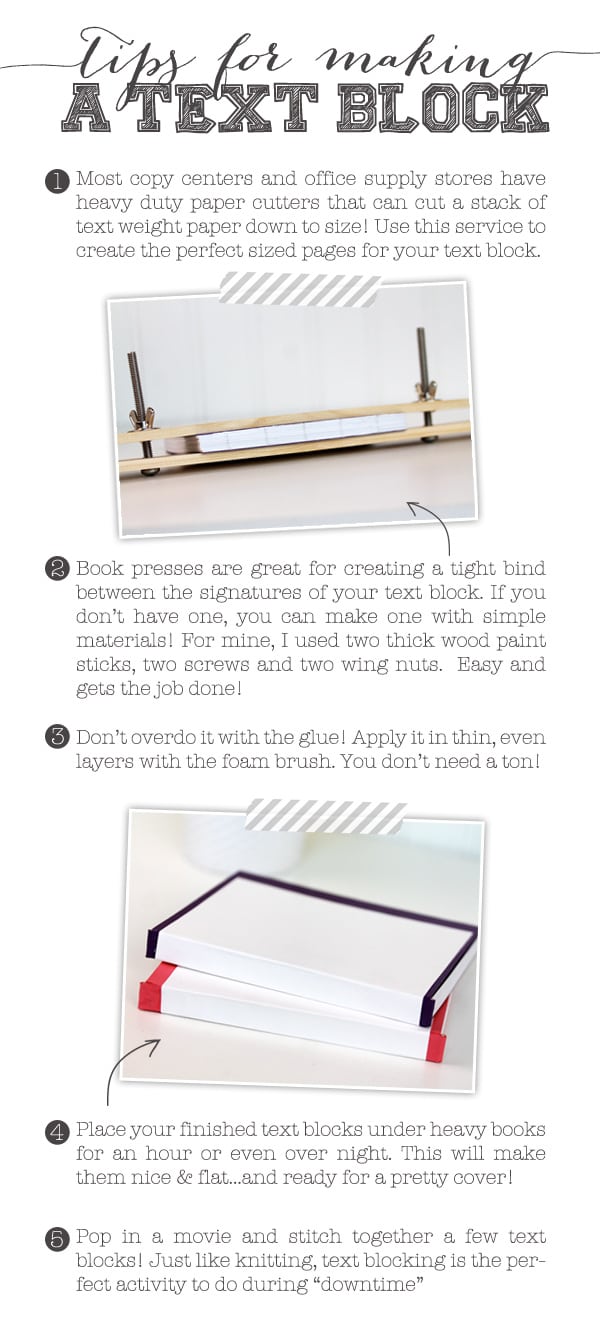
00:10 | Marking & Stitching the Text Block Signatures
3:18 | Stitching the First Signature
5:30 | Stitching the Second Signature to the First
8:10 | Adding Additional Signatures to the Text Block
11:17 | What To Do When You Run Out of Thread
14:03 | Placing Adhesive on the Spine of the Text Block
16:32 | Adding Cover Pages to the Text Block
MORE BOOKBINDING TUTORIALS
How to Make a Text Block | How to Make a Hardcover | How to Make a Composition Style Notebook | How to Make Your Own Bookcloth | How to Make Elastic Closures & Headbands | Perfect Binding

Wow! Amber this is the best bookbinding tutorial I’ve ever seen. The adage “the devil is in the details” is surely shown in this video. I’ve heard how-to videos are time consuming and wanted to tell you how much I appreciate the time you took out of your busy schedule to do this one. Your up-close view of connecting the signatures is amazing. Thank you! I’m off to do my homework. I’ll link pictures when I’m done. ;0 Go BU!
Super duper awesome. Thank you for taking the time to put this together so professionally.
Amber, I have a question. Why wouldn’t you incorporate the folded cardstock ends into the stitching of the block? I can see the glued edge if they were single sheets but since they are folded, sort of mini-signatures, couldn’t they be stitched into the block?
AWESOME question! Thank you so much for asking it! Here’s why: Let’s say you went ahead and stitched on the cover pages as mini signatures. Once you attach the cover pages to the cover, when you open your notebook, the first thing you’d see are those stitches running down the middle of that cover page/mini signature. For me, I prefer the clean look that you get by avoiding those stitches, especially when you are using patterned paper or colored cardstock for the cover pages, and the thread would be more noticeable. Hopefully that makes some sense! Of course, this is just my own design preference. You could totally stitch on those two cover pages if you prefer the look of exposed stitches. Up to you!
Amber, I guess my perspective from my previous bookbinding experience is ‘less glue, more stitching.” Most of my preferred bookbinding techniques were ones that fell in a category of Non-adhesive book binding. You are exactly right. I don’t mind the look of exposed stitching and, in fact, had several favorite styles where the spine stitching was beefed up to be part of the decoration as well as the structure. So I guess my biases created my question! Thanks for your clear explanations. You are making me want to bind a book, and I haven’t done one in quite a while.
And I love your improvised book press!
I love your enthusiasm as you show us. This was very instructive. I too had to grate anything that needed grating, however now when I grate I use the time to pray my prayer list and it is quite a blessed chore. Lol
Amber-fantastic! Big pat on the back to you for an excellent tutorial.
Amber, this was awesome!! Loved seeing how to combine the signatures together, can’t wait for the rest of the series. 🙂
Amber,
I absolutely love, love, love this subject. I don’t think thank you even begins to tell you how thankful I am for such a fantastic tutorial. I’ve been on a mission to do a few of these mini masterpieces for Christmas presents but since I have never done this before, I knew I needed to do my homework. I’ve been digging through blogs, You Tube, websites and books trying to get bits and pieces of information that I understand and that I can actually follow. I have always liked your style of teaching, if you will, you make it easy to understand and then implement. I’m so grateful that you decided to tackle this subject. I have to tell you, I’m glad that the www stars has finally aligned with mine, lol! Let me explain. I haven’t been getting your email updates since you re-did your site. No bid deal, it wasn’t a problem because I have your link in my fav’s and that’s what I use now. BUT, when you started Bookbinding University, the craft project I’ve been obsessing about for the longest time, the stars must have aligned and all of a sudden, I started getting your emails again. Hmmmm, interesting hey? lol! Whatever the reason, I’m glad I’m back in the groove with you. Looking forward to the rest of this tutorial!
Adorable. I always like to carry a notepad in my purse this is perfect. I will never purchase pocket notebooks again.
Hi, I just wanted to tell you that this tutorial is very instructable, it is educational and you tell all the secrets and tips. It is simple to understand and I am sure after seeing this, I will be able to make my own book too. Thank you very much, I appreciate your hard work on this tutorial. Greetings!
Amber,
I am so enjoying these bookbinding posts and videos. You’re inspiring me to want to try this myself. I was looking for the referenced tutorial for the “headbands” for the spine . Can you provide that link?
Thanks, Monica
Hi Monica! The “headband” lesson will be posted on Tuesday! Sorry for the confusion. It’s a very quick and easy technique.
Hi Amber!! I love your bookbindind serie and today I made my first attempt at it. I didn’t get the perfect paper block but I am giving myself therapy because imperfection is also good, right? 🙁 Anyway, thanks for taking the time to make these videos, you really make it all seem possible. I bought a paper block to start practicing with my signatures. Hopefully soon I will be able to publish my first one in my blog.
Hugs!!
Wow! Absolutely amazing, usually I find long tutorials boring and then I leave the project in the corner of my craft room ( short attention span) but you kept that really entertaining and I can’t wait to try it!
Thanks 🙂
Wonderful, first class tutorial!!!
Thank you
Ohhh myyyy gawwwwwttt!! This is awesome!! & i just save $95 from going to a book binding lesson from my local scrapbook store here in Singapore!!! Been wanting to try a book binding 😉 Love all your video! Thank You My Dear!!! I can use that $95 to buy all the material instead!! *wink*
Amber your books look amazing! Have you considered doing a written tutorial as I struggle with bandwidth to watch videos? I’d really love to make these as Christmas presents.
You’re fantastic! Your tutorials are SO clear and SO helpful, I’m very thankful!
-Shannon
What kind of paper do you use for the signatures?
Hi Brooke! I just use regular computer printer paper for my signatures but if you’d like to use something a little more professional looking, this Etsy shop sells lined signatures that I love!
https://www.etsy.com/shop/NovelTease
thank you SO MUCH for this tutorial! I’ve gotten started bookbinding recently, and I’m so excited to take it to the next level by making my own text blocks.
Hi Amber! Thank you so much for this whole site. It is number one on my crafty bookmarks bar. I am making coloring books for my neice and nephew, and am having a book themed wedding next year, so will be making plenty of them for different uses. I had a question about stitching, though. Would it turn out lumpy if I knotted off in the middle stitch of every signature in addition to the last one? I’ve just begun my first text block ever and noticed that I can’t quite keep it tight when reaching the end of my row, or at least wen I try and pull it tight, I’m afraid that I may rip the paper between the holes. Or maybe the tightness doesn’t matter when you reach the very end of the project? Thanks again!
Great tutorial. What is the unfolded size of the paper you are working with?
Thanks!
What an awesome & thorough tutorial! Thank you SO MUCH for posting!! :))
Your tutorials are so helpful!
I couldn’t find a journal that I loved for my upcoming trip and havde decided to make a customized one.
I have a question though – I want to have my journal pages lined and maybe a few pictures. What type of paper would you recommend for me to go get my templates laser printed onto?
I had my templates printed onto 32lb. paper but found what I got was super smooth/shiny instead of that perfect writing paper you usually find in journals.
Any help would be appreciated!
LOVE this. I want to make my own planner but hate spiral binding. How much space would you suggest I leave in the margin of the signatures?
Hi Amber! First of all, this is a fantastic tutorial and I LOVE your website. Secondly, I’m new to bookbinding but I followed your tutorial pretty well. I just have one question—is there a specific type of paper you use? I just used printer paper and I know it’s possible to use sketch paper for sketchbooks and watercolor paper etc. but just for a journal, what paper should I use? Thanks.
Hi Amber,
Fantastic tutorials! A couple of questions. Firstly, in the last step, when you attach the white cardstock to the almost-finished text block, do you glue to to the spine only, or do you fold it around and then glue it to the cover pages as well? Secondly, do you have tips for how to ensure the pages in your finished book are all perfectly flush? I tend to cut all of my signatures down to size (by hand) before stitching them together, but of course my punching and sewing can’t be perfect, and each signature falls of of whack. It’s only by fractions of a millimetre, but it takes away from that really finished, polished look. Thank you!
Hi! Just wanted to pop in and say your tutorial was amazingly helpful; I made a book for my class final with them, and they turned out great! I made a post and included a link to this page, I hope that’s alright!
(http://leiaham.tumblr.com/post/134635133042/today-was-the-final-for-dynamic-sketching-for)
Thanks for making this tutorial! 🙂
If we don’t have thread at all, we can just use a handmade book press right?
A very interesting text block, it is definitely useful for students. I recently wrote my cool article and I love this. My article about time management, this is a very useful thing that will help you manage your time correctly.
I like what you said about using a paper cutter to trim a stack down to the size that you want. My brother has been telling me about a book that he wants to publish soon. I’ll share this information with him so that he can look into his options for professionals who can help him with this in the future.
Thanks for the information
Guys, we were asked to write a mini-story (essay) about “Business Running,” how it works, and how profit is made in this business today at school. To be honest, I had no idea how to write this essay, so I called my friends and asked the teachers for help, but it was all in vain. Then, since he was always willing to assist me, I went to the Internet and used the free business essay database I adjusted it, and I am certain that I will receive a good grade tomorrow!.
It’s great that you talked about how to make a text block. Recently, my wife mentioned she needs to do some do-it-yourself book project. She needs to do several notebooks, books, and other bindery projects, so I’ll be sure to share this article with her. Plus, I think it’d be a good idea to help her look for a machine to ease the whole process. Thanks for the tips on how to get into bookbinding.
It’s great that you talked about how to make a text block. Recently I need to know how to make text blocks. Thank you so much.
The first international Dota tournament, The International, took place even before releasing the second part of the franchise. The prize discover here fund in this tournament totaled several hundred thousand dollars, and the famous team Navi was the winner. However, Dota 2 esports’ real heyday came later, after Dota 2 from Valve.Valve began to actively sponsor the development of esports in many of its projects, artificially increasing prize pools and attracting more interested players. Over the past ten years, Dota 2 esports has changed dramatically. This event is covered by professional commentators and entire studios of analysts, and the total prize fund is hundreds of thousands of dollars.